
How to Increase Outlook’s Default Attachment Size Limit
Most email service providers limit the maximum email size that can be sent or received by an account. But it’s actually a necessary restriction – otherwise, emails can be easily exploited by being flooded with very large emails.
If you try to send an email that exceeds the maximum limit of the recipient, it will bounce off and you’ll receive an error back in your mailbox. Outlook refuses to send emails with attachments larger than 20MB. That is inconvenient, because most email servers allow users to send 25 MB or larger emails. However, there are ways to send messages larger than 20 MB with Outlook, as long as you make sure that your email provider accepts it.
If you try to send a file larger than 20 MB in Outlook, you’ll get a message similar to “The attachment size exceeds the allowable limit.” Another variation of this error is “The file you’re attaching is bigger than the server allows.”
If you’re in this situation, there are several ways to tackle this issue. One way to mitigate the problem is to upload large attachments on cloud drives and only send the link to the recipient through an email. Cloud servers will allow you to upload files as large as 15 GB free of cost.
Another, more elegant solution would be to increase the default attachment limit in Outlook to match the email server’s default size. For Gmail and a few other email providers it won’t be a huge improvement, but if you use a self-hosted email server or Exchange, you can go way higher.
Below you have a collection of methods that will allow you to send larger files through Outlook. Take a look!
Changing the Attachment Size Limit in Registry Editor
The guide below will show you how to edit the registry so that your Outlook will allow larger attachments limits. We are going to modify the parameter of MaximumAttachmentSize using the Registry Editor. Here’s what you need to do:
- Press the Win key + R to open the Run dialog box. Type “regedit” in the box next to Open: and hit OK.
- Depending on your Windows version, you will be taken to a User Account Control box. Click on Yes to advance.
Once the Registry Editor is opened, navigate to the preferences folder by following the paths below. Make sure you follow the appropriate path according to your Outlook version.Outlook 2016: HKEY_CURRENT_USER \ Software \ Microsoft \ Office \ 16.0 \ Outlook \ Preferences
Outlook 2013: HKEY_CURRENT_USER \ Software \ Microsoft \ Office \ 15.0 \ Outlook \ Preferences
Outlook 2010: HKEY_CURRENT_USER \ Software \ Microsoft \ Office \14.0 \ Outlook \ Preferences
Outlook 2007: HKEY_CURRENT_USER \ Software \ Microsoft \ Office \ 12.0 \ Outlook \ Preferences
Now check the Decimal option and enter the attachment size limitation in the Value data box. The size limit needs to be added in kilobytes. For example, if you want to set the size limit to 25 MB, you need to enter 25600. It’s good practice to reduce the Outlook limit to allow some wiggle room of at least 500 KB.
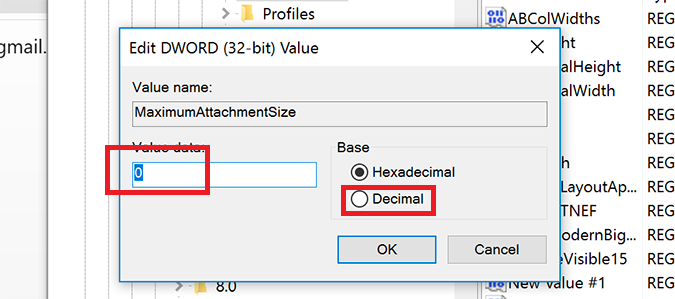
Note: If you’re using Exchange, be advised not to set the MaximumAttachmentSize higher than the account is allowed. If you fail to do so, the message will not send. Even more, do not leave the file size limit to 0 as it will render all your emails undeliverable. Press Ok and close the registry editor. Try sending an email through Outlook with an attachment larger than the size previously allowed.